Data Management with Blueprints in Unreal Engine 5
Since Unreal Engine 4, the Blueprint visual scripting system has made programming games in Unreal vastly more accessible, however, it is not without limitations. But how far CAN you go with Blueprints alone?
Let’s dive into the systems I’ve been designing for this project, Xenex: Conscientious Culling. In this top-down turn based game, the player takes the role of manager of a crew of space exterminators and is trying to increase profit enough to qualify for promotion to middle management. Earning company credit builds toward this goal but can also be used to replace units that have died on the job. With that mechanic in mind, we need a way to keep track of an integer variable between multiple levels while still being able to write to it to change its value (for example, if we purchase a new unit).
Introducing the Unreal Game Instance!
A typical way to handle the problem we discussed earlier in other engines would be by using a persistent instance, or singleton, of a class that can act as a game manager. Since we’re using Blueprints we really only have one option: the Unreal Game Instance. Thankfully this turns out to be a great method since it’s built in and part of normal engine operation whether we run a packaged standalone or a Play In Editor session. Anytime your game is running, you have a single instance of the Game Instance class. The same instance will stay until the application or session ends.

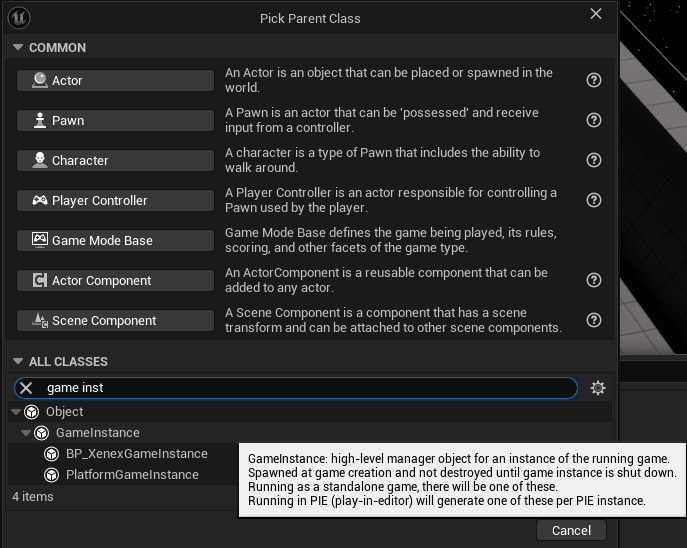
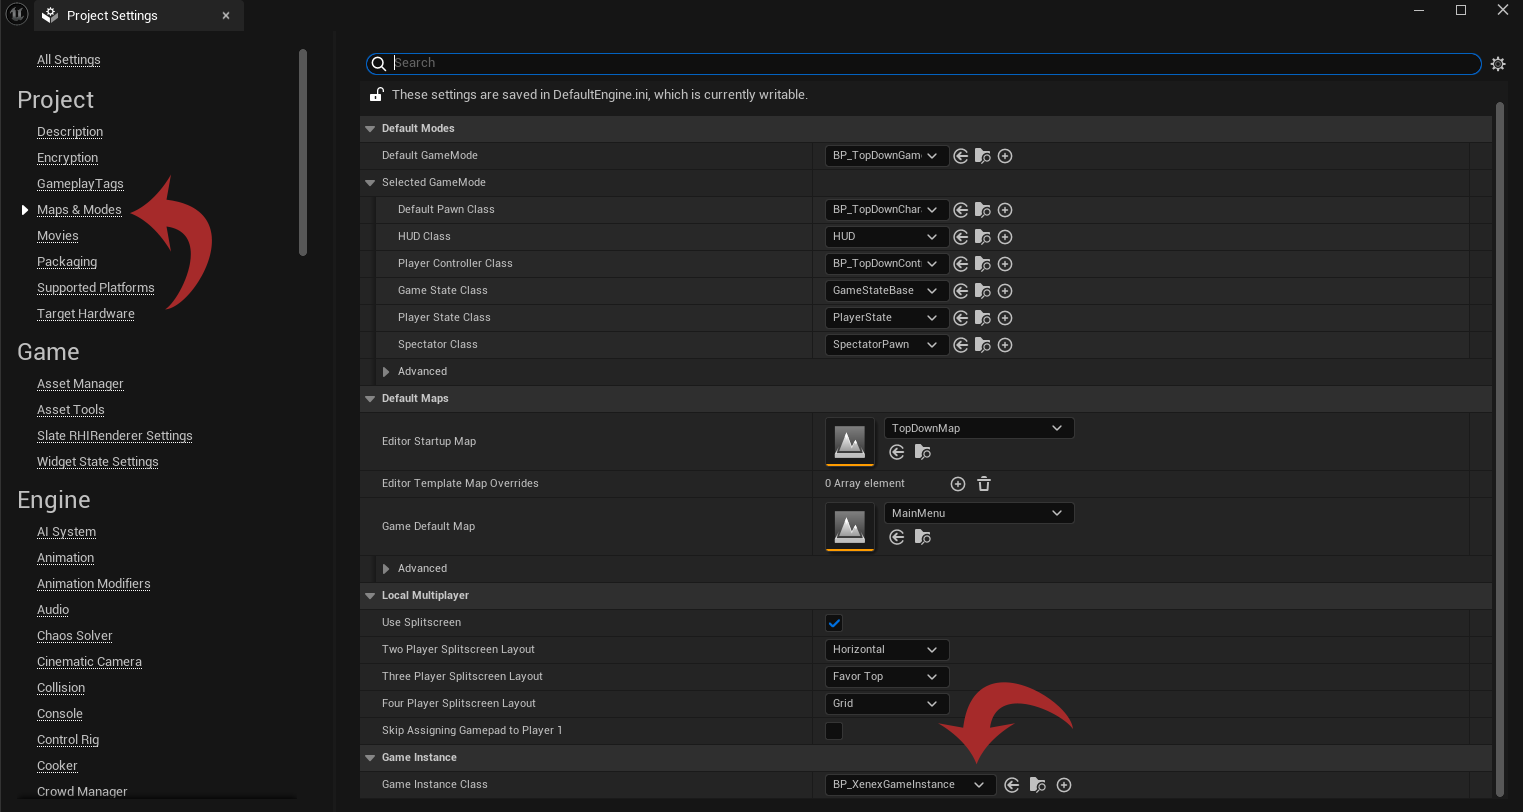
If we want to modify the Game Instance to hold our own data, like how many credits we have, we’ll need to create a separate child Blueprint that inherits the default behaviors. To do this we’ll simply right-click in the Content Browser and choose to create a new Blueprint. Under “All classes” we’ll search for “GameInstance” to make our new Blueprint class a child of the default UgameInstance class. Then we can give our new class a name. I’ve named the one for our project “BP_XenexGameInstance” so we know which is the custom instance we made for Xenex. Before we go any further we’ll want to hop over to Project Settings and make one more adjustment. Under “Maps and Modes” we’ll want to make sure we tell the engine to use our custom Game Instance for our project by selecting it from the drop-down.
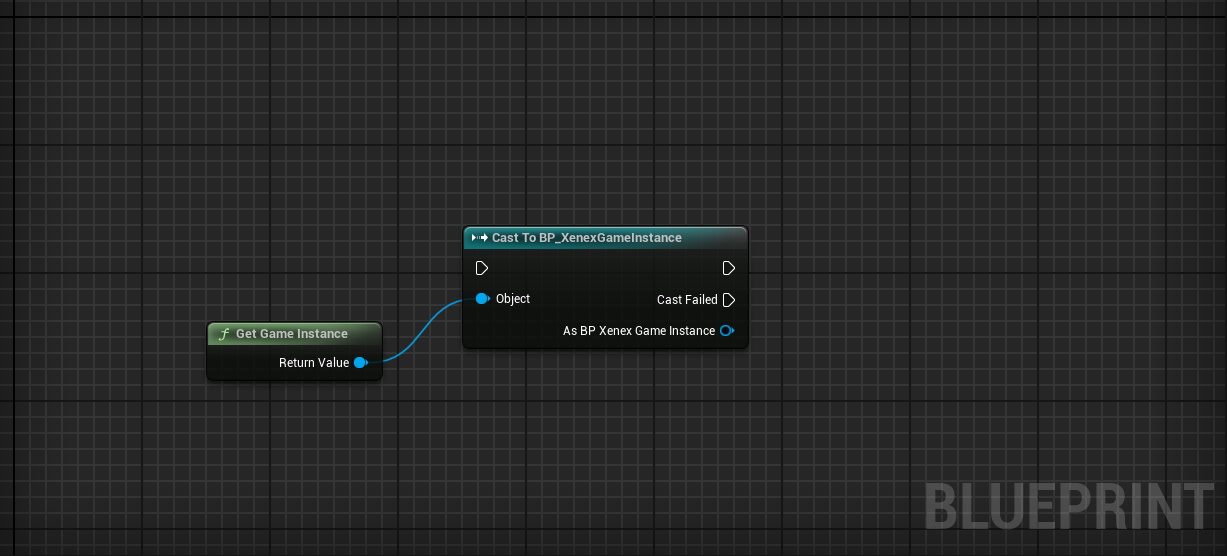
Now that we’ve created our custom Game Instance and told the engine to use it for this project, we are ready to start creating the variables we need. For starters, we’ll create and integer variable since we’ve decided only to handle payments in game with whole numbers. I’ve simply called this “Currency.” Once we’ve done that we can already begin accessing that data from any class in any scene or level in our game by simply getting the Game Instance with the “Get Game Instance” node and casting the object reference to our custom class:
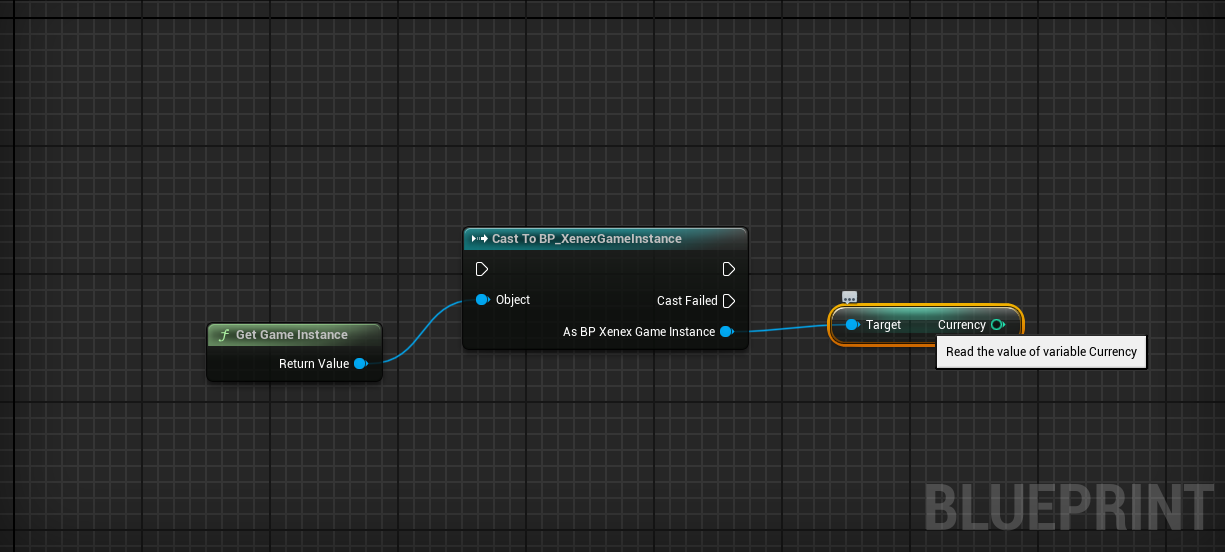
Once we’ve cast to our custom Game Instance class we can access its variables and functions:
Speaking of functions, I prefer to create functions within a class to edit its variables since manually setting values externally can sometimes cause problems with other dependent systems (for example, if you manually set a pawn’s health from another class, it may not trigger an update event to the entity’s health-bar, even though the health variable’s value changed). So I’ll quickly create some functions to handle adding and removing funds from our current currency value:
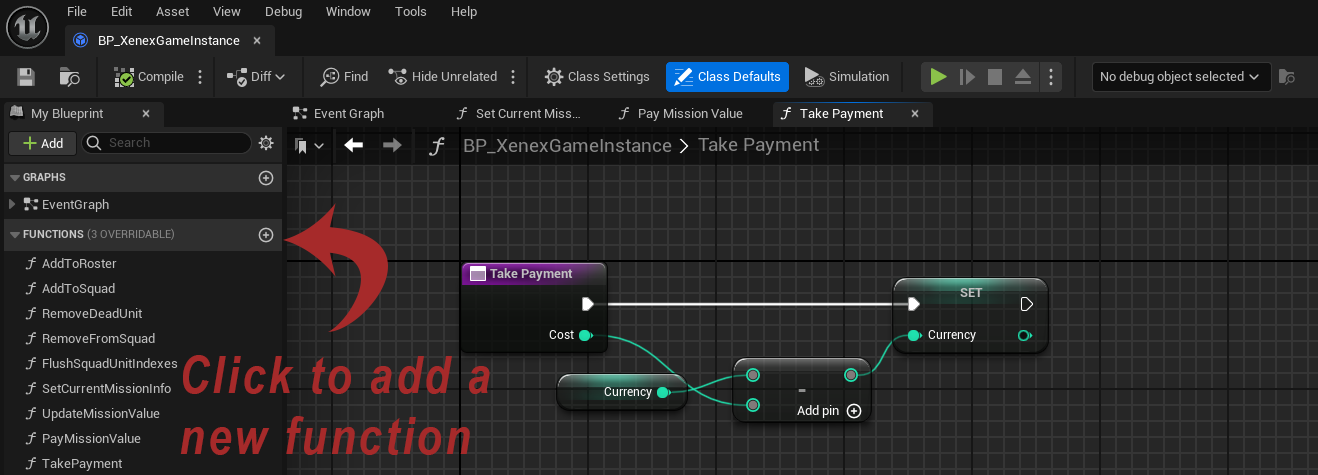
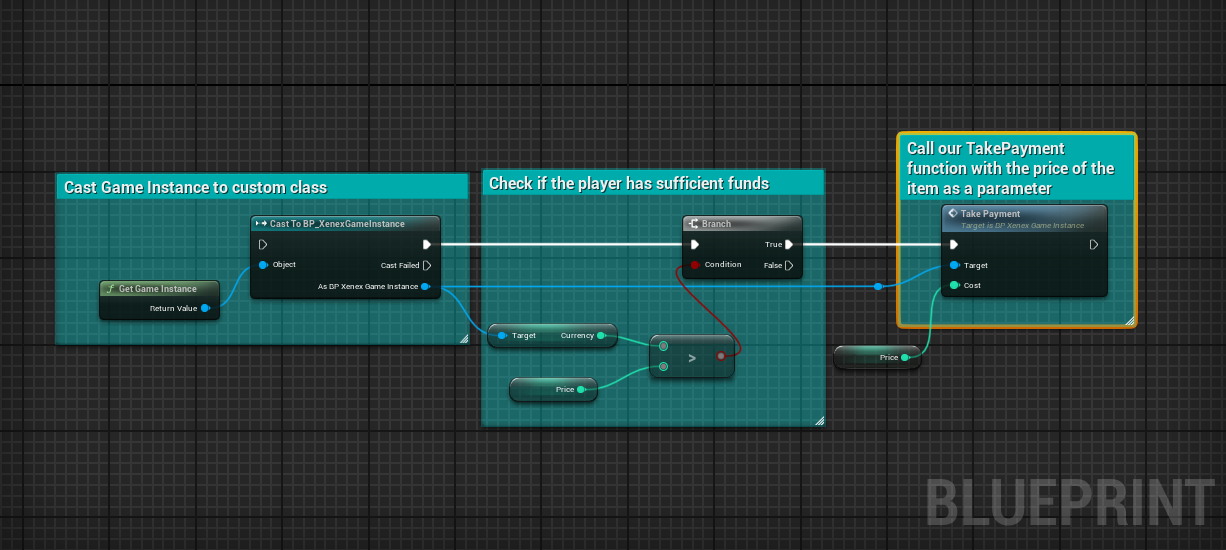
Now I can easily call this function by getting a reference to the Game Instance and change the value of our currency by passing in a parameter for the cost of an item or the amount of money the player earned from completing a mission. Below is an example of how I would reference taking payment from another class:
While an integer might form an integral part of a game’s design, let’s be honest, it’s really not exciting. Now that you understand the basics of using the Game Instance, let’s introduce another variable type we can use in Unreal: the struct. A struct is a user-generated collection of values that can be used and referenced like any other data type.

An example from Xenex: we have five separate unit classes which inherit the same basic behaviors (like walking, taking damage, etc.) but which all have unique stats. For a character class in Xenex we’re talking about health, accuracy, damage, and action points. We also keep track of a few other types of data which I’ll explain as we go, starting with Enums.
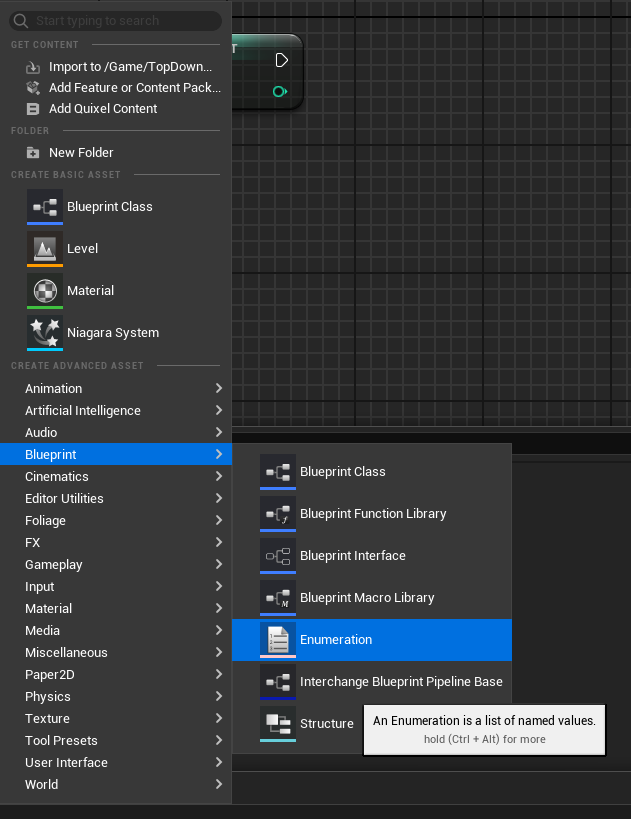
Enums, or Enumerations are a set of predetermined named values. (Really they are just byte data so you could use the “Switch on Int” node to handle case statements, but Enums offer greater readability which can be especially helpful if you are collaborating with others.) Since Blueprints are all about making code easier and more accessible lets create our first Enumeration by right clicking in the Content Browser and choosing “Enumeration” from under the Blueprint Section in “Create Advanced Asset:”
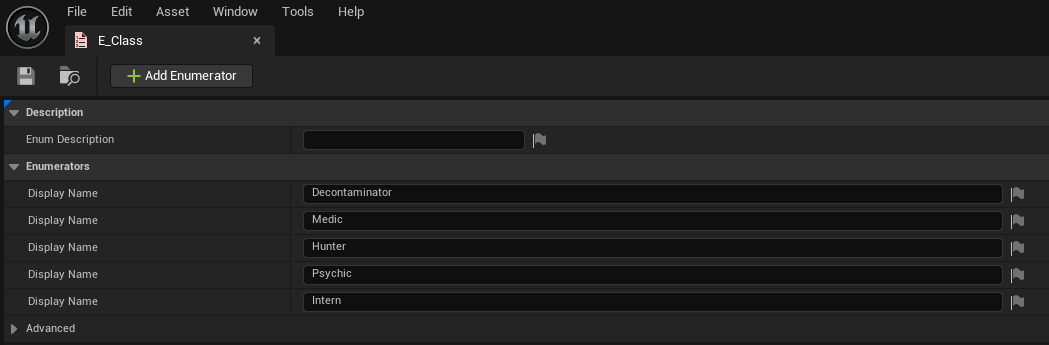
The Enum I’ve created will keep track of which class a character is so I’ve put the names of the five classes in my “E_Class” Enumeration:
Now that we have made a custom Enum to track our class names let’s get back to our struct. We can create a struct from the same menu we made our Enum: by right-clicking in the Content Browser and selecting Blueprint from “Create Advanced Asset” and selecting “Structure” from the bottom of the list:

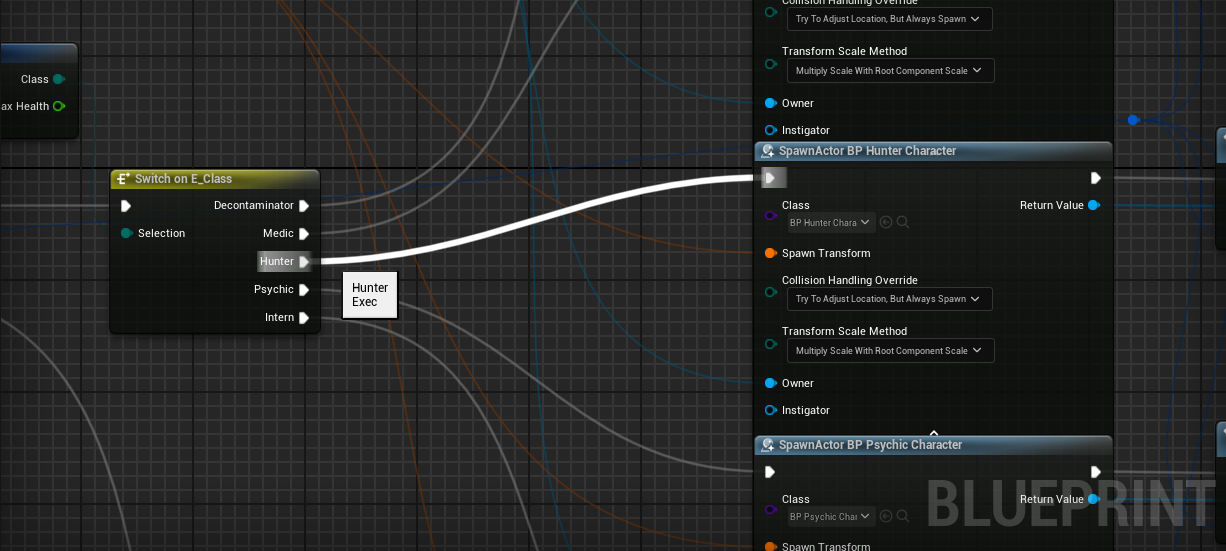
We can then add variables to our struct, starting with our custom Enumeration value for the character class. Using this Enumeration we can easily create readable case statements using a “Switch on E_Class” node. Here’s an example: in Xenex the player can have a squad of four units of their choosing. The current squad is actually stored as an array of S_Class structs in our custom Game Instance. Once the player starts a mission, the spawners for the player characters can read from this array to know what class to spawn at each position. Here’s a sample of the code used to spawn a unit of a particular class:
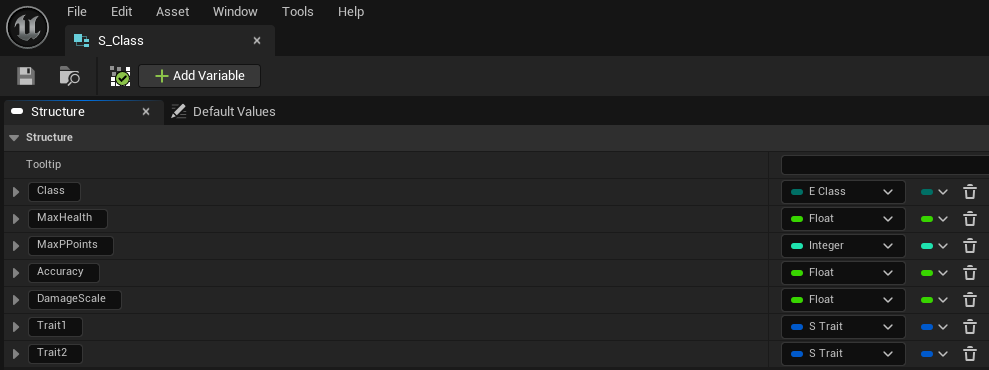
Likewise, since our struct holds different data types, it can also tell the spawner how much health a unit should have. That’s the next value we would add to our struct. In the following screenshot I’ve gone ahead and populated our class struct with all the data we want to keep track of. Don’t worry about what “Trait 1” and “Trait 2” are, just know they are another custom structure I created, so yes, you can include a struct in the data set of another struct!
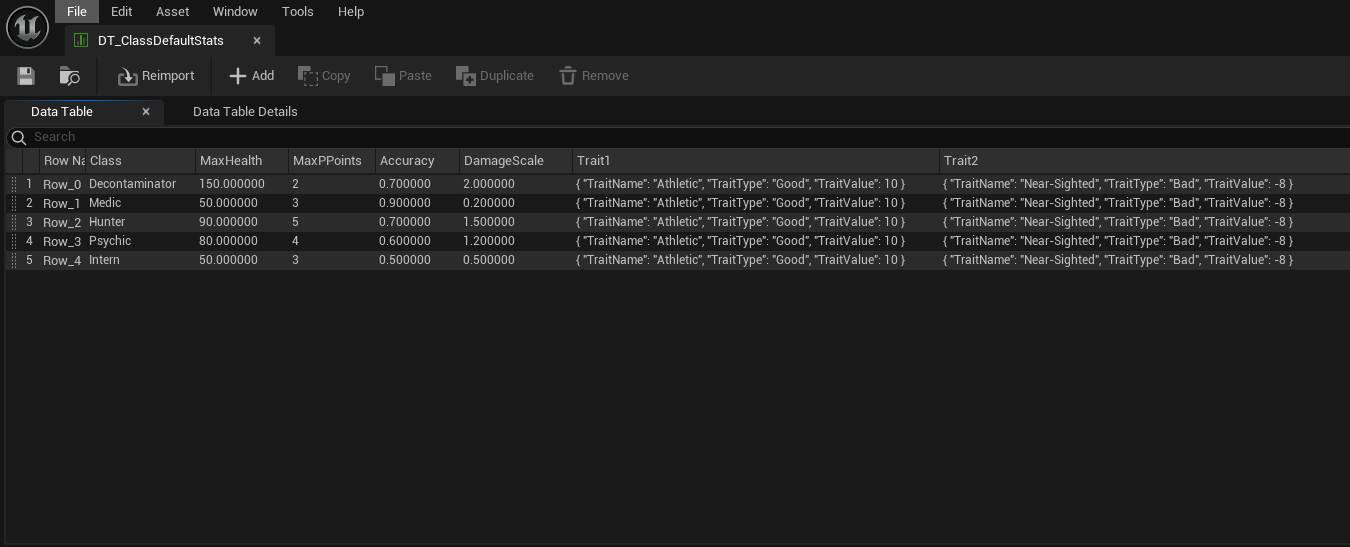
Each variable inside a struct can be given a name and default value as well. At this point the astute might say, “Jon! You said you have five class types, but in this struct you only have the default values for one of them!” This is true; we aren’t quite done yet. Our S_Class struct is the template for a character class. If we want to keep track of the default values for health, action points, etc. for every class we can create a Data Table to define multiple character class defaults. To create a Data Table, go back to the “Create Advanced Asset” by right-clicking in the Content Browser again, then find Data Table under the “Miscellaneous” category. In the Data Table below each column is one of the values we defined in the S_Class struct, and each row is one complete set of values for a variable of type S_Class:
Now we have a data asset that holds the default stats for every character class we have. Let’s take a quick look at how that information can be used. When the player returns to base between missions they can hire new units to replaces ones that have died. The candidates available are generated using the Data Table we just created. In the Blueprint we can get a random S_Class struct by choosing a random row from our table:
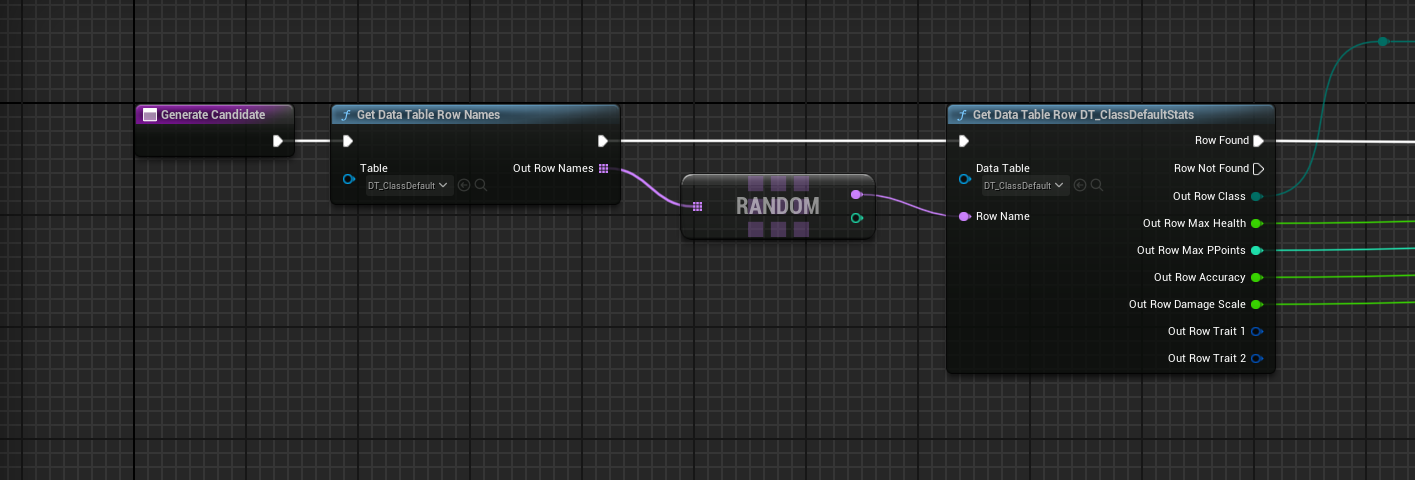
After getting data from the table we can right-click and select “Split Struct Pin” to see the individual variables we added to the S_Class structure we created earlier. Remember, the table we made hold an example of S_Class in each row, so when we fetch a random row from that table we return a complete structure with all the default data we want for a character.
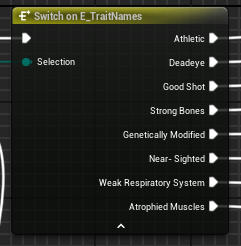
Similarly to how I created a struct and Data Table for our character classes, I also created a struct and Data Table to hold the values associated with character traits, extra quirks that modify a character’s default stats. We can choose a random row from the traits Data Table to generate a random trait then we can use a switch statement for the Enumeration of trait names to determine how the different stats should be affected:
From there we can add or subtract from the relevant stats and return the updated values.
You can now see different methods for storing, transferring, and modifying complex data using Blueprints in Unreal Engine. By creating a few Structures, Enumeration, and Data Tables I was able to create a relatively robust character randomization system with room for expansion. These data types can feel overwhelming at first but if you learn how to leverage them you can greatly increase the complexity of your game design and systems. I hope this guide has helped take you in that direction. If you want to learn more I’ve linked the sources that helped me understand these concepts better.
Best,
Jonathan
“UgameInstance” – Unreal Documentation
“Blueprint Struct Variables in Unreal Engine” – Unreal Documentation
“Unreal Engine 5 Basics - Structs, and how to use them!” - Burrow Games on YouTube
https://www.youtube.com/watch?v=MQ2pBnkLmWI
“Unreal Engine 5 - How to Create and Use Data Tables (BASICS!)” - Fortuna Interaction Studios on YouTube
https://www.youtube.com/watch?v=Mb2iWvDxXNk
“UE5.3: PASSING DATA BETWEEN LEVELS” – Eternal Stellar Games on YouTube
Leave a comment
Log in with itch.io to leave a comment.